
Monos luggage is the best for all your travel needs!
Why I make my dog's food... and how!

UPDATED: June 2023
I started making my food for Nolte and Zaza in May 2021. Za started having seizures about a year before and they were only getting more frequent. (Scariest thing ever to witness!) The vet told me that “it just happens” to some dogs. Even though that is probably true, I wasn’t willing to accept that as her reality. He also recommended she go on a certain medicine, but I am the queen of saying no thanks to drugs as often as possible. (I even hesitate taking advil for headaches. Just drink water - is what I tell myself instead.) I’m a BIG believer in using food to heal. Most of our body’s issues stem from poor nutrition/digestion… so, why not start there for Za?
I had been feeding my pups what I thought was great food their whole lives. Always opting for raw options or grain free… all the big buzz words that are there to tell you “your dog is safe with us!”. I still am a big supporter of Stella & Chewy’s raw food options. I give my pups their tiny treats daily! It was the dry kibble I was using where I really had to change things up. My research showed that some of the filler foods most dog food companies include in their recipes can cause allergic reactions or other random issues/disorders in dogs. Hot spots, itchy/flakey skin, ear infections, digestion troubles, and even seizures. I was sent an article by a friend that showed when allergies get severe enough, the swelling of the brain can cause seizures. Now, I am not a vet nor do a work in the medical field, but this article was enough to get me to make some changes.
So, here we are over two years later and the new diet is going great! They get this recipe as well as a variety of chews like bully sticks, cow tracheas, and other protein and calcium sources. It seems to be working because Za went from having a seizure every few weeks to now only having one every few months. So, clearly something good happened with this change.
UPDATE: As of January 2023, I started giving both Zaza and Nolte a CBD supplement. This has almost knocked out Za’s seizures completely. She has had ONE since January!!! This is a miracle considering her seizures had increased to 1-2/week at the end of last year… and she finally had seizures where she lost bladder control. That was devastating and the end of the road for me.
I went to PAWS on Chicon in Austin and they gave me an allergy test to administer to Za in order to figure out what may be causing these seizures. We figured out that she had a severe allergy to beef, eggs and a few other main proteins. So, there went the beef I used to add to their homemade diet!!! Now, we are on a strict ingredient list as mentioned below. They also take the Super Snouts ISOHEMP-150 CBD tincture as well as a variety of allergy-friendly treats. The CBD has definitely been the main helper for Za’s seizures, but it’s also been a big help with Nolte’s joints. He was having trouble walking around and I know it will only get worse the older he gets… after giving it to him for a week, he was a different boy!
NOLTE + ZAZA’S GOURMET MEAL
My recipe changes every time I make it because I like to switch it up a little each time for their interest/benefit. Plus, it’s nice to get new nutrients into their system every now and then. So, feel free to customize this to your pup’s needs!
INGREDIENTS:
5 pounds ground turkey
Lots of veggies - carrots, broccoli, green beans, zucchini, squash, cauliflower, sweet potatoes, and spinach are all options I usually choose. Usually, I use eight or nine bags of frozen veggies (cut up small as I have two yorkies under eight pounds each.) and about 10 carrots
Six cups of brown rice
Olive oil

DIRECTIONS:
I use a 20 quart pot to create this beast of a recipe. I got this amazing one via Amazon. It’s also perfect for canning if you are that type of person. (I dream to become “that person” one day.) Put some olive oil in that pot and then throw in your ground protein. Cook it on Medium or a little cooler. Cooking meat at too high of a temperature can be harmful to pup’s digestive system. See details on that here.
While the meat is cooking, you can start to prep the veggies. I throw everything into a food processor for a quick job! Keep any carrots or sweet potatoes separate because you’ll want to cook those longer than everything else.
In a separate pot, prepare brown rice. Just follow the instructions on the packaging. Just don’t add any butter or salt.
When the meat is done, strain the fat and set the meat aside. (I also throw this in the food processor too to eliminate any chunks.)
In the big pot, throw in a couple table spoons of olive oil and then cook those carrots and sweet potatoes. You want to cook them first since they take a bit longer to soften. Add a bit of water as needed if the carrots are browning and sticking to the pan. Plus, it helps them soften faster to have a bit of moisture.
Once they are soft, throw in the rest of the veggies. Stir together and cook until all are warm and cooked through.
Add in the ground protein and rice and stir.

That’s it! It’s time consuming, but so simple. It usually takes me a few hours to do the whole thing, but that’s only because I have to chop up all the veggies for my pups. That’s the most tedious part.
I put the food into quart size freezer baggies and store for when we need them. This batch usually lasts me a month or so for two small yorkies.
The best part… I eat it too! I LOVE this stuff. On nights I don’t feel like cooking, I will tap into the dog food. Just add salt, pepper, and a touch of high quality olive oil and this stuff sings!
Check out my Instagram stories highlights to watch this happen in video form!
Photo Storage + Archiving
Do you have a ton of photos and have no clue how to keep them organized? Do you spend SO much time digging through old photos on your computer trying to find that one from that one session you did a few years ago with that girl from that thing? Yeah… I feel you. I have created a fool proof way of organizing my images that has proven super successful over the past fourteen years. So, sit back, absorb this goodness and start organizing your images like a boss.
First, let’s start with proper storage. I am a big supporter of external hard drives. If you’re a pro, they are crucial. And, with the advances in technology, you can get super tiny and compact drives that carry multiple terabytes. Yes, you read that right.... TERABYTES! I usually have a 3 or 5TB small WesternDigital hard drive for each year and then a larger 12TB hard drive to keep a backup of everything from the past (however many years/photos will fit) AND then I do my backups on a third external 3 or 5TB hard drive through Time Machine (if you’re an Apple user).
So, if you’re keeping count… that’s THREE external hard drives I have to keep my photos backed up and protected.


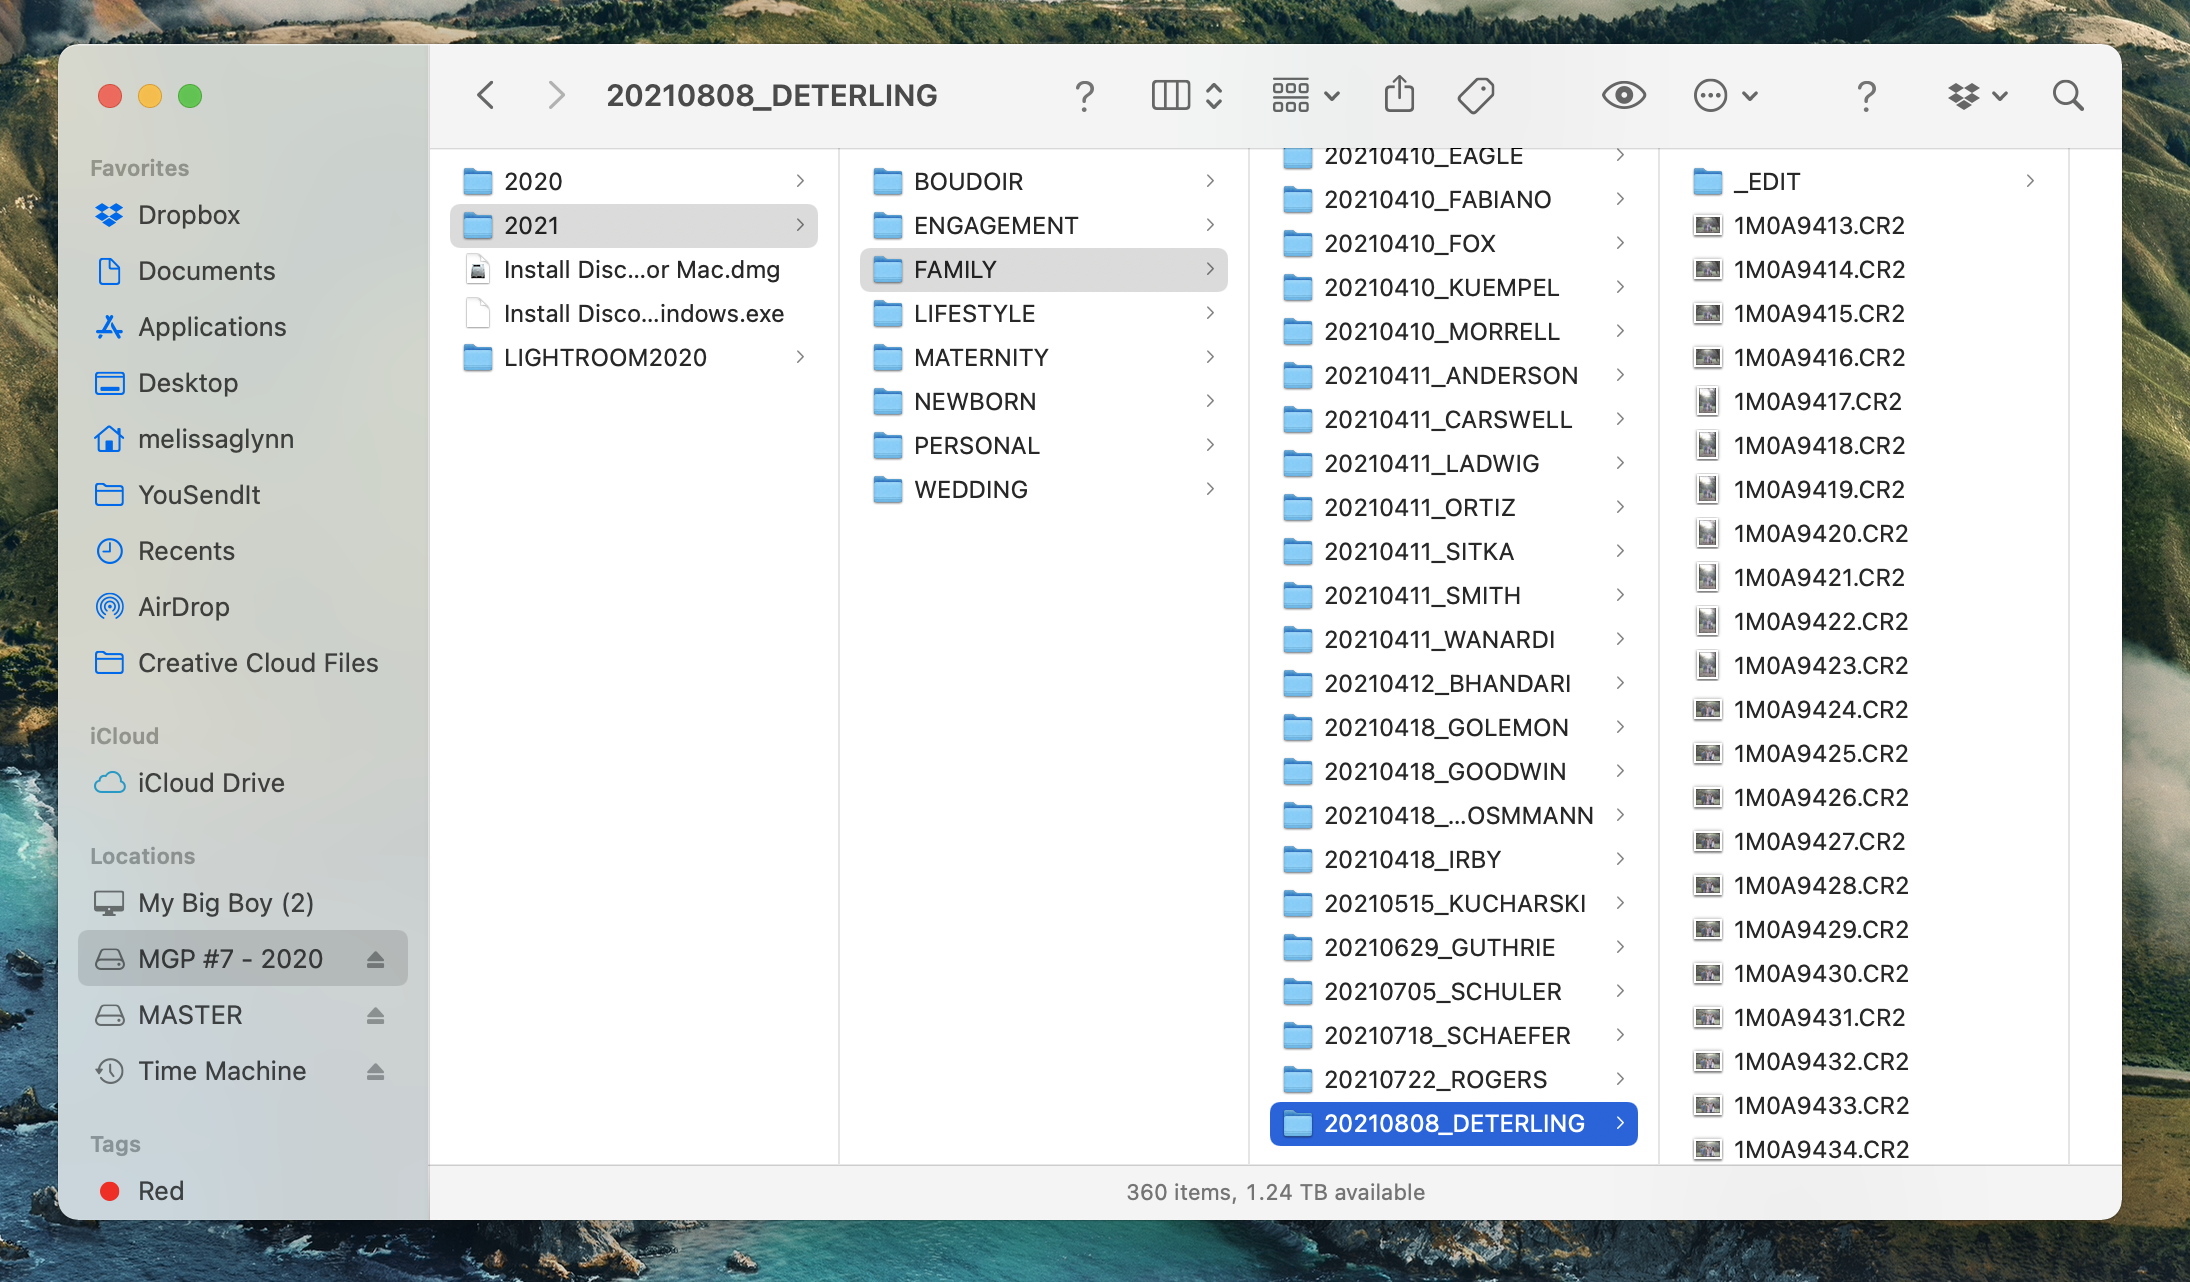
Okay, you’ve got the hard drive… now what? Organize that shit! Below, I have included a screenshot of how I organize my files. It’s a system that has been so successful in helping me stay organized and able to quickly reference images.
I label all of my working hard drives by a number. ( I used to name them a city name by alphabetical order, but that got too confusing, so I stopped at Boston. Weird, I know.) So, now, we do numbers and it’s worked out great. Here we are on MGP #7. Since last year was in the crapper, we were able to utilize #7 for both 2020 and 2021.
Inside #7, I created a folder for each year as well as for all of my Lightroom presets and files. I kept Lightroom 2020 for both 2020 and 2021 since they are on the same hard drive because why make it harder for myself?
Inside of the folder 2021, I have each category of session that I offer. I used to just put every shoot in date order into one folder, but I found that putting them inside categories made it FAR more simple as I do over 150 family sessions a year and those clutter up my search process. This also makes it easier for me when editing in Lightroom because I’m able to shut a tab inside of the file management screen once all jobs are edited inside a category. (If you know, then you know.)
Inside the category folders, I have each session listed by date. I write out the YearMonthDate_Client’sLastName method. This has worked great for me since I am always editing in chronological order.

Open the Job Folder and inside I place all RAW images. For weddings specifically, I create two folders - one for the FIRST and SECOND shooters so I know which images were shot by the specific photographer. Once all images are edited, I export the JPG files into a folder called “_EDIT”. I place an underscore at the beginning of the word EDIT in order to keep that folder at the top of the image number list. Had I not done that in the collection, the EDIT file would go to the bottom of every set of images instead of staying at the top like the screenshot below.
After I upload a job to my “working hard drive”, I then drag and drop the files into my “MASTER” drive to make sure I have double back ups in case one hard drive fails me. Now… (knocking on wood BIG TIME) I have never had a hard drive fail me in all of my years of being a photographer. I am so fortunate to be able to say that. However, I HAVE had a memory card corrupt on me twice. Once, I lost a family session and the second time, I lost about 100 images from a wedding. That was BRUTAL! We lost photos of the bride’s family… and most important, her grandfather. My heart shattered when this was realized as my grandfather was so important to me and if I lost photos of my grandfather at my wedding… I would be devastated.
This taught me a very valuable lesson in that it’s crucial to have backups for my backups. I keep all memory cards for a shoot or event on my desk until the job has been completed and delivered… just in case. This does require me to have a TON of memory cards, but it’s worth the investment to avoid this issue from ever occurring again. I use Lexar CF and SD cards exclusively. I haven’t updated my card reader in a while, but when I do, it will be this Syntech Thunderbolt reader. (Great for Apple computers.) For all you USBers out there, this is a great option!

And, the final step in my process is client delivery! I use Pixieset and LOVE LOVE LOVE them! The design of their software is beautiful and the quality of their products is perfection. You can see how my client gallery home page looks to my clients below. It ties in seamlessly with the design of my website, so clients can’t even tell they’ve left my site. They take all the hard work out of client print orders for which I am forever grateful. One less thing for me to have to worry about and my clients are all so well taken care of! Use this link to sign up and receive 250MB of bonus storage! WOOHOO!!

And, that’s it! It may seem like a ton of steps and so much work to get it set up, but I promise you it’s worth all the effort to ensure your images are safe, backed up and protected. Every photographer is different, so customize and build out your system however works best for you! I’m happy to answer any questions you may have, so feel free to drop them in the comments below!
Happy Shooting!
(Note: I am an Amazon Affiliate. Yay!)
Let's Talk About Lashes!!

One of the easiest way to glam up your look is lashes. Am I right?!
If you’re like me and aren’t a huge fan of faux lashes, you can take the route I did and use a lash booster serum. Babe Lash and Revitalash are both proven to be amazing and yield fantastic results! I used Babe Lash last year for a few months and my lashes went CRAZY! I stopped using it and they soon went back to their normal state.

Recently, I had a client (hi Ashley) who had the most STUNNING natural lashes. So stunning, in fact, that she didn’t need faux lashes for her boudoir session. Her makeup artist and I were both in awe and begging for her secret! She told me about Revitalash and I immediately bought it!


I remembered I still had a Babe Lash serum in my makeup drawer, so I pulled that out and started using it every night before bed. It’s been about two weeks and I can already see a small difference, but I know a big change will hit my eyes soon enough.
If you have sparse lashes or just want a boost to your current lash line, invest in one of these today! They are both great options and have proven results that I’ve seen first hand.

Want fuller brows too?
Babe Lash can help with that too! Just apply the serum over your brows and watch the fullness happen!
Have you ever tried one of these products? If so, comment below with your experience… I’d love to see before and after photos if you have them!
You’re welcome!
xoxo
(Note: I am an Amazon Affiliate. Yay!)